# Working with Code
TIP
This tutorial is assuming you are using a general-purpose web view. Using code to show web view in Safe Browsing Mode is much easier, and described in the Safe Browsing Mode guide.
In this tutorial, we will see how to create and use UniWebView with code. In this tutorial, you can learn:
- How to attach a
UniWebViewcomponent to a game object. - How to load a sample page in the web view and handle the loading events.
- How to work with some essential features like JavaScript and UniWebView messaging system.
Enough talk, let's begin.
# Creating a UniWebView
Create an empty Unity project and import UniWebView. If you haven't imported UniWebView or read the Installation guide, we recommend you follow it first. After importing UniWebView, remember to restart the Unity Editor, as well as change the target platform to either "iOS" or "Android" in Build Settings.
The first task is creating a UniWebView by code and make it show our content. In previous chapter, we did it with the prefab. But it is only a fast way to show content with very limited configurable items. Here, to get more control of the UniWebView component, we will do it in code, step by step.
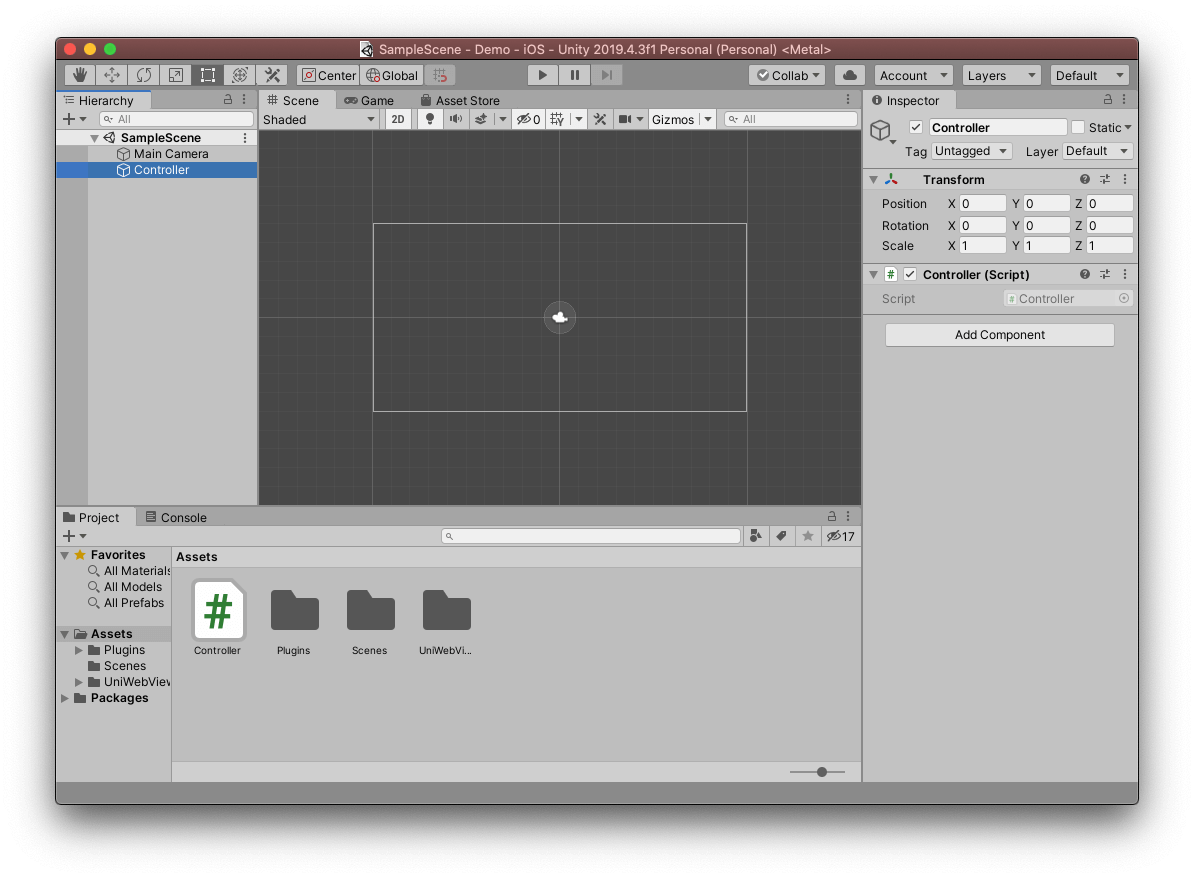
In the opened sample scene (or you can also create a new scene), add an empty GameObject by GameObject → Create Empty in menu. Rename the newly created game object to "Controller". It will be our controller object for the scene. Then, click Assets → Create → C# Script to create a script with "Controller" as its name.
Finally, choose the Controller object in Hierarchy tab and add Controller.cs component by using "Add Component" button in the Inspector. After these steps, your project should look like this:
Open Controller.cs with any text editor you like, modify the content of that file to:
using System.Collections;
using System.Collections.Generic;
using UnityEngine;

public class Controller : MonoBehaviour {

    UniWebView webView;

    // Use this for initialization
    void Start () {
        // Create a game object to hold UniWebView and add component.
        var webViewGameObject = new GameObject("UniWebView");
        webView = webViewGameObject.AddComponent<UniWebView>();

        // More to add...
    }

    // Update is called once per frame
    void Update () {

    }
}
It creates a new GameObject with the name of "UniWebView" in the current scene when the Start() method called for the Controller. We also add a UniWebView component to the game object and store the component in webView.
Now let's add more code to config the web view and load our sample page now. Add the code below at the end of Start() method, just below the "More to add..." comment:
void Start () {

    //...

    webView.Frame = new Rect(0, 0, Screen.width, Screen.height); // 1
    webView.Load("https://docs.uniwebview.com/game.html");       // 2
    webView.Show();                                              // 3
}
- Set the web view's frame to the full screen. On iOS and Android, it will use the display size and make the web view take all of the area. On macOS Editor, the player screen size will be used to create a new window which contains web view.
- The
Loadmethod will do exactly what you expect, it starts to load the page at the given URL. Here, we load our demo page hosted on the UniWebView site. You will see it later. Showthe web view so it becomes visible. This method and its oppositeHidemethod has several parameters to control the transition. For now, we just use the default behavior without any animation. You can learn more about this topic in the Transition chapter.
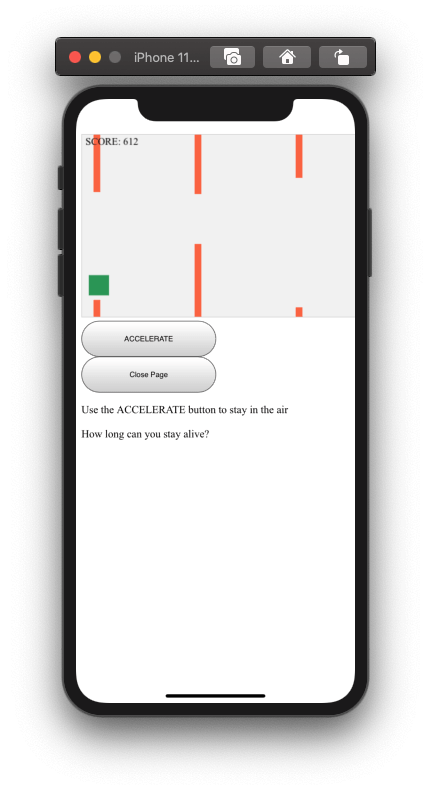
Now, you could start the game to see what will happen. If everything goes fine, when you click the "Play" button, you should see the demo page, which contains a canvas and two buttons:

The page itself does nothing interesting now. It will even navigate you to an unexisting page when clicking the "Close Page" button. Notice that there is a text saying "Call startGame() to begin". Yes, it is the key! If you take a look at the source code of that page in a desktop browser, you will see the startGame is a JavaScript function and it will make our web page game start.
The web page code
The page is no more than an HTML with some script. startGame() is one of the function defined in the page.
<html>
  <head>
    <meta name="viewport" content="width=device-width, initial-scale=1.0" />
    <style>
      canvas {
        border: 1px solid #d3d3d3;
        background-color: #f1f1f1;
      }

      button {
        width: 150pt;
        height: 40pt;
      }
    </style>
  </head>

  <body onload="prepareGame()" data-gr-c-s-loaded="true">
    <canvas width="480" height="270"></canvas>
    <script>
      // ...

      function startGame() {
        this.interval = setInterval(updateGameArea, 20);
      }

      //...
    </script>
    <br />
    <button
      onmousedown="accelerate(-0.2)"
      ontouchstart="accelerate(-0.2)"
      onmouseup="accelerate(0.05)"
      ontouchend="accelerate(0.05)"
    >
      ACCELERATE
    </button>
    <a href="uniwebview://close">
      <button>Close Page</button>
    </a>
    <p>Use the ACCELERATE button to stay in the air</p>
    <p>How long can you stay alive?</p>
  </body>
</html>
Our next task is calling the startGame function on the page. To do that, we need to first know some loading events of the web view.
# Listening to the Event
Calling a JavaScript function just below the webView.Show(); does not work. It probably gives you an error, due to the page is still loading and the function does not yet exist on the page. You need to wait for a while before the function gets available.
UniWebView has a powerful event system to let you know what happens to the web view. You can know when the page loading successfully finished or failed with an error; Or when the screen orientation is changed so you have a chance to adjust the web view size.
Here, we need to inspect the loading finished event. When this event raised, we ensure that the page is fully loaded and the startGame is ready.
Continue to add more code below the final line of Start:
void Start () {

    //...

    webView.Show();

    webView.OnPageFinished += (view, statusCode, url) => {
        // Page load finished
    };
}
OnPageFinished is an event will happen when the page is fully loaded.
We add an action handler to this event by += a block. Whenever the page is loaded, the code in this block will be executed.
If you are not familiar with
ActionorDelegatein C#, this documentation (opens new window) of .NET Framework contains more detail explanation on the syntax.
# Some Cleaning Work
Now we are ready to call the startGame JavaScript function. But before we dive into it, it is a good chance to have a look at another important event in UniWebView first.
OnShouldClose is an event sent to you when the web view is about to close. The users can use the "Done" button on iOS toolbar or "Back" button on Android to close the web view. When the web view closed, the UniWebView component will be also destroyed automatically to keep things clean. If you are holding the web view in a reference (e.g. here we hold the web view by webView property), it is a good chance to set it back to null.
TIP
On Android, the "Back" button will navigate your user back to the previous page. If there is no page to go back, it will send the OnShouldClose event and try to close the web view if true is returned.
To do that, listen to the OnShouldClose event and reset webView at the end of Start method:
void Start () {

    //...

    webView.OnShouldClose += (view) => {
        webView = null;
        return true;
    };
}
# Unity to Web View - Calling JavaScript
Let's go back to the JavaScript! Invoking a JavaScript function in UniWebView is easy. Call EvaluateJavaScript inside the OnPageFinished action body:
void Start () {
    //...

    webView.OnPageFinished += (view, statusCode, url) => {
        webView.EvaluateJavaScript("startGame();", (payload)=>{
            if (payload.resultCode.Equals("0")) {
                Debug.Log("Game Started!");
            } else {
                Debug.Log("Something goes wrong: " + payload.data);
            }
        });
    };

    //...
}
EvaluateJavaScript receives a JavaScript code in string format for the first parameter. Here we run startGame();. The second parameter is an Action with UniWebViewNativeResultPayload. In the payload returned as the JavaScript result, the "0" value in payload.resultCode means that the JavaScript is executed without any error.
Now, run the scene again, the web view should start automatically after page loading finishes. Still remember Flappy Bird (opens new window)? It's time to play!
# Web View to Unity - Messaging System
When you, unfortunately, run into an obstacle, the game will be stopped. That is not what we expect: we should be able to restart the challenge. It requires a way to detect when the game is over. With the help of the Messaging System of UniWebView, we are able to send a message from web view through a specified URL scheme. Let's try it.
UniWebView by default is inspecting any URL starting with uniwebview:// scheme. When this kind of URL received, it sends a message to Unity instead of loading it in the web view.
If you take a look the HTML source, you can find this code below which will be executed when the game end, which loads a uniwebview:// URL:
window.location.href = "uniwebview://game-over?score=" + myGameArea.frameNo;
In UniWebView, an OnMessageReceived event will be raised when this URL is loaded. Add this code at the end of Start():
void Start () {
    //...

    webView.OnMessageReceived += (view, message) => {
        if (message.Path.Equals("game-over")) {
            var score = message.Args["score"];
            Debug.Log("Your final score is: " + score);

            // Restart the game
        }
    };
}
The action handler receives a message, in which the URL is parsed. Here we check its path to see whether it is game-over. All parameters in the original link are set to Args. We get back the final score by accessing the "score" key and then print it to the console.
Finally, let's restart the game. The easiest way is reloading the whole page. Just call Reload on the web view. Add a Restart method and invoke it with a delay:
void Restart() {
    if (webView != null) {
        webView.Reload();
    }
}

void Start () {
    //...

    webView.OnMessageReceived += (view, message) => {
        if (message.Path.Equals("game-over")) {
            var score = message.Args["score"];
            Debug.Log("Your final score is: " + score);

            // Restart the game after 3 second
            Invoke("Restart", 3.0f);
        }
    };
}
Play the game again. The game will restart when you hit an obstacle.
Navigating to URL
In the example above, we used a JavaScript window.location.href to navigate the page to uniwebview:// link. Besides of using the JavaScript, a normal HTML link with <a href="uniwebview://..."> tag also works. You will see an example in the "Close the web view" practice below.
# Practice
Let's do some practice to help you understand the whole thing better!
# Score to Star
Instead of displaying the score as a point, a normal choice is showing how many stars the player gets for easier understanding. For example, below 1000 points gives 1 star, 10001~2000 gives 2 stars, etc. There is already a function to convert an input point to star count on the web page:
function getStars(score) {
  // ...
  return starCount;
}
Try to call this method to see how many stars you've earned! It should be possible done by an invoking of EvaluateJavaScript and getting the data of returned payload.
Solution
In the OnMessageReceived above, when the game is over and the score is extracted, call getStars:
void Start () {
    //...

    webView.OnMessageReceived += (view, message) => {
        if (message.Path.Equals("game-over")) {
            var score = message.Args["score"];
            Debug.Log("Your final score is: " + score);

            webView.EvaluateJavaScript($"getStars({score})", (payload) => {
                Debug.Log("Stars: " + payload.data);
            });

            // Restart the game after 3 second
            Invoke("Restart", 3.0f);
        }
    };
}
# Close the web view
The "Close" button is not functional yet. This button on the page, in fact, is a link to uniwebview://close:
<a href="uniwebview://close">
  <button>Close Page</button>
</a>
You can add another if statement in the OnMessageReceived to handle it. To close the web view, call Destroy(webView);.
Solution
void Start() {
    // ...

    webView.OnMessageReceived += (view, message) => {

        if (message.Path.Equals("game-over")) {
          // ...
        }

        if (message.Path.Equals("close")) {
            Destroy(webView);
            webView = null;
        }
    };
}
TIP
If you got any trouble in the practice, you can find the final version of Controller.cs here (opens new window). However, we strongly suggest you try to implement it yourself first!
# Next Step
Congratulations! You already have the basic ideas and learned the essential parts of UniWebView. Now you are ready to create and use the web view in your project.
There are much more than what mentioned in this tutorial. We prepared a bunch of resources for you. If you need to know deeper about UniWebView, pick the topics you are interested in from the "UniWebView In Depth" part and keep reading. Please also read the API Documentation to know details about the provided APIs.